Home / Construction / Thermal Bridges and Mould / How to spot thermal bridges and eliminate the risk of mould? (español – français)
How to spot thermal bridges and the risk of mould?
Share this page
Summary:
Thermal losses of a building through thermal bridges
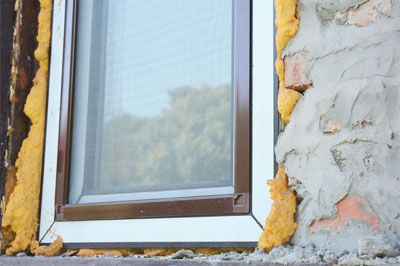
Thermal bridges are insulation faults in the insulating envelope of the housing. In the winter they conduct the heat towards the outside and in summer towards the inside. Thermal bridges are both a source of thermal discomfort, heating overconsumption and the origin of mould development when coupled with inefficient ventilation.
To detect any mould formation (ongoing or future), we rely on the surface temperature of the inner wall and the temperature of the dew point.

The thermal bridges can represent up to 30% of heat losses
Causes and consequences of thermal bridges

Origin of thermal bridges
The most common thermal bridges in the building are at the level of:
- wall junctions of different nature: from wall to windows, from wall to roof, slab/facade connection, cross wall/facade connection, etc.
- complex junctions: vertical insulation then horizontal, lintels, window sills, balcony slab, angles, …
- insulating fasteners: frames and connecting elements (metal plugs, threaded rods, etc.)
- air intakes formed by plugs or various openings.
Unlike external insulation, in the case of internal insulation, it is difficult to avoid thermal bridges.
Thermal bridges are design defects and/or defects in the installation of the insulators (continuity defects between insulators, angles, etc.). Thermal bridges are not to be neglected because eventually they will have several consequences:
- factor of the surface condensation development or even mould if combined with excess of air humidity and poor ventilation.
- insufficient heating power if it has been calculated as accurately as possible (especially for new buildings which follow the latest thermal regulations)
- overconsumption of heating and/or air conditioning
- factor of deterioration or destruction of insulating and surface materials (detachment, distension, loss of insulating efficiency…), if the conditions are met for the development of an excessive condensation and mould.
What equipment do you need to identify thermal bridges and anticipate mould formation?

Thermodetector and measuring apparatus for identifying thermal bridges
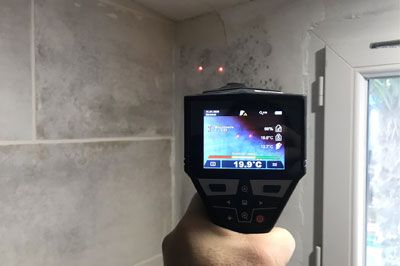
It is necessary to carry out the readings (thermogram) with a camera or thermal infrared camera (also called thermo-detector). With professional equipment the analysis is precise, non-invasive, non-destructrice.
Information to be collected are:
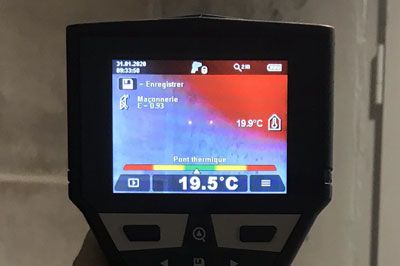
- surface temperature of the wall (maximum 1% of inaccuracy): directly without contact with a laser beam. Possibility to adjust the emissivity coefficient ε of the material of the measured surface (wall, tile, wood, etc.). Indeed, the surface temperature is measured through the radiation emitted by the wall, that is its emissivity. The value measured by the device needs to be corrected according to the material of the actually measured surface.
- ambient temperature (maximum 1% of inaccuracy)
- relative air humidity (maximum 2% of inaccuracy)
How to interpret the results and identify thermal bridges?
If on a localised spot the difference between the surface temperature of the wall and the ambient temperature is significant, a thermal bridge is identified.
There is a risk of thermal bridge when the deviation is 5 or 6°C, which needs to be specified by new measurements.
>>> Beyond the difference of 6-7°C the thermal bridge is proven revealing an insulation defect.

Thermodetector and measuring device to identify the thermal bridges
The device reports thermal bridges (sometimes with an audible warning or using a colour code).
How to identify the risk of mould with the dew point?

Thermodetector and measuring device to identify thermal bridges
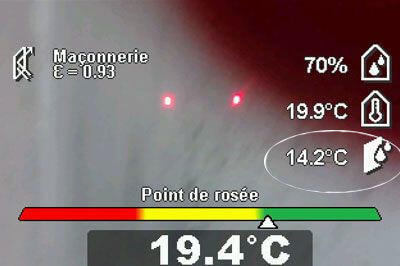
The dew point corresponds to the temperature at which the water vapor in the air starts to condense (water droplets) in contact with a cold wall. It depends on the ambient temperature and the relative humidity of the air (bathroom, kitchen, laundry room, …).
The thermodetector (or thermal camera) calculates the temperature of the dew point from the relative humidity of the air and the ambient temperature.
In the example above, an ambient temperature of 19,9°C at a relative humidity of 70% results in a dew point temperature of 14.2°C. Here the surface temperature of the wall is 19,4°C, so there is no risk of mould.
The device does not detect the mould spores but indicates the conditions for their development using the dew point temperature that is compared to the wall surface temperature.
>>> There is a risk of mould when the air humidity is too high and/or the wall temperature is too low and below the dew point temperature calculated by the device.
How to take the measure correctly?
The device may be equipped with additional functions like:
- measurement of the contact temperature (via a type K thermocouple probe – attention to surrounding electromagnetic disturbances)
- “Hot Point” or “Cold Point” function
- best possible level of resolution (up to 76 800 pixels (320 x 240) for a better accuracy of distance measurements)
- led lighting of the measured area
- photos and/or videos taking and saving (cable transfer, bluetooth, wifi).
For an optimal result, the measuring gun must be directed perpendicularly to the centre of the surface to be measured. Bright surfaces (or highly reflective) and transparent materials (glazing) must be excluded as reliable values cannot be obtained by this process.
Attention, the measurement of relative humidity may be distorted by the emanation of paints, varnishes or other chemical products.
It is advisable to aerate before taking the measure, to allow the ambient temperature to rise to a usual value and only then to take the measure.
It is also advisable to take several measures at different times and periods of the day to set the results according to different conditions.
How to prevent the risk of mould?
The solutions to prevent mould development are:
- regular ventilation (or permanent or automated depending on air humidity),
- increase of ambient temperature by favouring radiant heating in order to increase the surface temperature of the wall,
- removal of thermal bridges and improvement of insulation (if possible). A good insulation mechanically pushes the internal condensation out towards the outside of the wall. It increases the surface temperature of the inner wall, therefore keeping it away from the dew point.
Other topics that may be of interest to you
To know more about the latest innovations in terms of construction
To know more about Understanding and choosing your insulation
FOX47


